Beginner Loom Weaving: From Setup to First Project

Loom weaving produces fabric by interlacing two sets of threads at right angles: the warp (running lengthwise under tension on the loom) and the weft (passed horizontally through the warp). For someone starting without prior experience, a rigid heddle loom is the most accessible entry point: it requires fewer components than a floor loom, costs less, and is capable of producing functional cloth from the first session.
This guide covers what you need to get started, how the setup process works, and how to complete a basic plain-weave project — a small scarf or table runner — as a first piece.
Choosing a rigid heddle loom
Rigid heddle looms are sold in several widths, measured in centimetres or inches. The weaving width (also called the "weave width" or "dent width") determines the maximum width of cloth you can produce. Common sizes for beginners are 40 cm (approximately 16 inches) and 60 cm (approximately 24 inches).
Heddle sett
The rigid heddle itself has a fixed number of slots and holes per centimetre — called the "sett" or "dent count." A 7.5 dent heddle (7.5 slots and holes per 2.5 cm, or per inch) is commonly recommended for beginners because it accommodates worsted-weight yarn, which is easy to handle and available from most Canadian yarn shops. A 5 dent heddle works with bulkier yarns; a 10 dent heddle is used for finer DK or sport-weight yarns.
Most manufacturers sell replacement heddles separately, so you can start with a 7.5 dent and add other sizes over time.
Canadian suppliers
Rigid heddle looms from Ashford (New Zealand) and Schacht (USA) are distributed across Canada through specialty craft and weaving shops. Some Canadian-made options exist at smaller scale from independent woodworkers. Online marketplaces occasionally carry second-hand looms at reduced prices, which is a practical option for testing the craft before committing to a full-price purchase.
What you need before warping
- The loom and its rigid heddle in the appropriate dent size
- Two shuttles (at minimum one stick shuttle)
- A warping peg or warping board (often included with the loom)
- Warp yarn: smooth, non-stretchy, tightly twisted. Recommended for beginners: a mill-spun worsted-weight wool or cotton. Avoid handspun singles, which break under warp tension.
- Weft yarn: can be the same as the warp, or a softer/different yarn. For a first project, using the same yarn for both warp and weft reduces variables.
- Scissors, tapestry needle, and a ruler or tape measure
Calculating warp length
The length of warp thread you prepare determines the finished length of your cloth, with adjustments for take-up and draw-in. Take-up refers to the shortening that occurs as the weft bends over and under the warp threads. Draw-in refers to the narrowing of cloth width as the weft pulls the warp threads inward at each pass.
A practical formula for a beginner scarf project:
Warping the loom
Warping is the process of placing the calculated number of threads onto the loom at the correct length. The standard method for a rigid heddle loom uses a warping peg clamped to a table at a measured distance from the loom.
Steps
- Clamp the warping peg to a table at a distance equal to the total warp length (215 cm in the example above).
- Tie the yarn end to the loom's back apron rod.
- Pass the yarn to the warping peg and loop it around; return to the loom.
- Thread the returning loop through a slot in the rigid heddle, then continue to the back apron. This counts as two warp threads.
- Continue until all slots are filled.
- Move threads from slots to holes: unhook each slot thread and re-thread half the threads through adjacent holes, alternating slot–hole across the heddle. This alternating pattern creates the shed (the space the shuttle passes through).
Threading sequence: The standard "hole–slot–hole–slot" threading is the foundation of plain weave. Raising the heddle lifts the hole threads, creating one shed; dropping it below neutral lifts the slot threads, creating the other shed. Passing the shuttle through each alternating shed produces the interlocked plain-weave structure.
Winding a shuttle and weaving
Wind the weft yarn onto the stick shuttle without over-packing — a shuttle that is too full will not pass cleanly through the shed. Leave enough yarn to overlap at the selvedge (edge) by a few centimetres when beginning.
To begin weaving:
- Advance the warp so the heddle is positioned about 30 cm from the front beam.
- Raise the heddle to the up position to open shed 1.
- Pass the shuttle from right to left through the shed.
- Before beating, angle the weft in a slight arc across the warp. This arc provides the extra length that the weft needs as it bends over and under warp threads; a weft pulled straight across will cause draw-in.
- Beat the weft into place by bringing the heddle to the neutral/down position firmly against the previous row.
- Move the heddle to the down position (shed 2). Pass the shuttle left to right.
- Repeat from step 4.
Finishing the cloth
Once weaving is complete, the cloth is cut from the loom. The cut warp ends need to be secured to prevent unraveling. Two common approaches:
- Overhand knots: Tie groups of four to six warp threads in an overhand knot close to the last weft row. Simple and appropriate for scarves.
- Twisted fringe: Divide the ends into groups, twist each group tightly, then allow two adjacent groups to twist around each other and secure with a knot. Produces a more decorative finish.
After securing the ends, wash the cloth in cool water by hand or on a delicate machine cycle (if the yarn is superwash). This process — called wet finishing — allows the fibers to bloom and the weave structure to settle. Allow to dry flat.
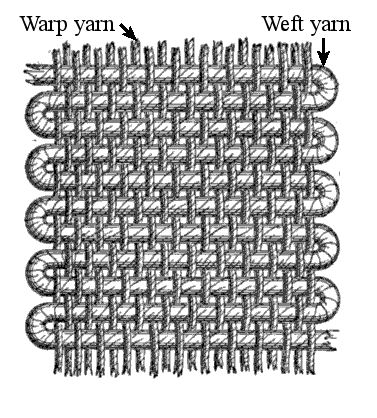
Warp images and structure references
The basic warp-and-weft interlacement in plain weave is documented extensively in textile scholarship. The Wikimedia Commons image below shows warp and weft threads in a traditional weaving context:
Last updated: May 25, 2026